What are XMP and EXPO profiles and how do I use them?
XMP and EXPO profiles automatically set your system RAM to higher frequencies. Here's how to do it.

XMP or Extreme Memory Profiles, is an Intel technology that allows you to change multiple memory settings, whereas EXPO is the AMD equivalent. Both methods enable higher memory speeds simply by selecting a profile in your motherboard BIOS, providing you have the correct supported RAM.
While XMP itself has the term "Profiles" in the acronym, "XMP profiles" is the common term for different settings for different levels of RAM overclocking. Yep, we know, but the grammar police were apparently sleeping on this one.
Still, If you’ve ever wanted to overclock your memory but didn’t want to fiddle with frequency, voltage and timings, this is the way to do it.
How does XMP memory work?
When you power on your computer, it conducts a power-on self-test. Part of this process includes automatically configuring installed hardware, including your memory.
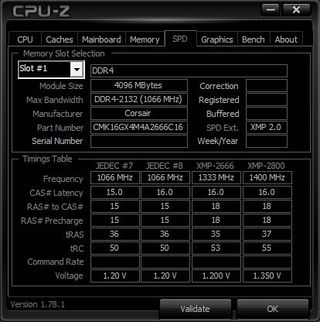
Your computer needs to know the model of your RAM as well as which timings and frequency to set. Your BIOS will use a small chip on your RAM modules called an SPD (Serial Presence Detect) chip to set memory timing and frequencies properly. XMP is an extension of SPD which provides higher frequencies and tighter timings for your memory to run at. It also corrects for the extra voltage required which provides a stable overclock with the click of a button.
XMP profiles essentially allow high-performance RAM, which run above industry DDR specifications, to be appropriately set up for your system.
How do I enable XMP?
How do I enable XMP?
XMP profiles can be accessed from within the BIOS on supported motherboards. These profiles may provide different levels of overclocking, which can all be checked via the BIOS.
There are two major versions of XMP in use today, and which one you can use depends on your memory and platform:
- XMP 2.0: This is common for DDR4 memory. It offers two XMP profiles as standard.
- XMP: 3.0: This was launched alongside DDR5 memory. It offers up to three XMP profiles as standard and a further two customisable user profiles.
To enabled XMP, simply enter your BIOS at boot by repeatedly pressing the selected key (this can vary from manufacturer to manufacturer, although most will tell you which key to press during the boot sequence), find the setting for XMP or memory speed, enable it and select one of the profiles, save your settings and reboot.
If you can't see the setting, make sure that your BIOS is not in "Easy mode", as some motherboard manufacturers have two different sets of settings available, and "Advanced mode" may enable the option for XMP profiles.
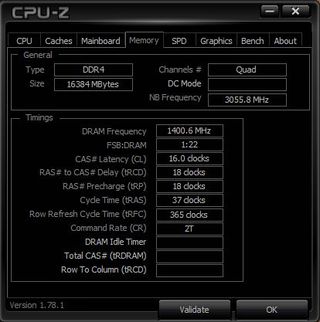
Once you're back inside Windows, ]you can confirm your new overclock using a program such as CPU-Z to check the memory speeds. Remember that your RAM is DDR or Double Data Rate, so the RAM frequency will register as half your actual speed, i.e. if your XMP profile is set to DDR3200, the frequency in MHz will be shown as 1,600MHz.

What if I don't turn on XMP?
All high-performance RAM uses XMP profiles, because they all run above standard DDR industry specifications. If you don't enable XMP, they will run at your system's standard specifications that are dependent on the CPU you have. That is to say, you won't take advantage of the higher clock speeds that your RAM may have.
In most circumstances, this will be fine. Your system will simply run to spec, and you can rest easy knowing everything is nice and stable. However, XMP allows your system to set motherboard and CPU parameters correctly, to allow higher frequency RAM modules, that are designed to run beyond usual specifications.
Failing XMP you could always find out the XMP profile speeds and feeds for your RAM and enable them manually in your BIOS.

Why are there multiple XMP profiles?
XMP supported modules contain two or three factory set memory profiles, depending on which version of XMP you have available. That'll be either XMP 2.0 or XMP 3.0.
The first profile usually contains enthusiast settings; these allow your memory to run at the rated speed advertised on the box. These settings enable only a modest overclock and are also the most stable. The second profile often contains more extreme settings that offer a much higher level of performance. The third profile is usually similarly set up for more extreme memory, too.
It's worth noting that these XMP profiles are set by the manufacturer, so may differ between memory sticks. XMP 3.0 also offers two user-configurable profiles for your own fine-tuning.
Is XMP stable?
Any time overclocking is involved, there is a risk of instability. With XMP the configurations included are thoroughly tested for the specific memory you are using, however. The timings, voltage and frequency are set to compliment each other and mitigate much of the instability that can creep up with a manual overclock.
No automatic configuration can account for outside factors, though, such as a CPU overclock. This is something to keep in mind if you experience any instability.
Similarly, if you're mixing and matching RAM sticks from different sets, you may be limited in which XMP profiles are stable. Usually the top speed of the worst set of RAM sticks is your best bet for stable operation, but you may still be able to push speeds and latency further if required.
| Header Cell - Column 0 | XMP 1.0 | XMP 2.0 | XMP 3.0 |
|---|---|---|---|
| Memory Technology | DDR3 | DDR4 | DDR5 |
| Vendor profiles (static) | 2 | 2 | 3 |
| Rewritable profiles | None | None | 2 |
| Descriptive profile names | No | No | Yes |
| CRC Checksum | No | No | Yes |
| On Module voltage control | No | No | Yes |
| Total bytes allocated to XMP | 78 | 102 | 384 |
What are the differences between XMP 2.0 and XMP 3.0?
XMP 3.0 offers more profiles than XMP 2.0, for greater fine tuning of your memory's speeds and latency. It's been introduce alongside new DDR5 memory, and is able to offer three factory set XMP profiles out of the box and two user configurable profiles if you prefer to go it alone. These profiles can also be renamed.
XMP 3.0 also comes with support for more standardised voltage control through DDR5's integrated voltage regulator.
Perhaps the most exciting feature to arrive alongside XMP 3.0 is Intel's Dynamic Memory Boost Technology. This automatically switches between JEDEC standard and XMP memory profiles for preferred performance and efficiency at any given time. This is an Intel platform feature, however, so AMD chips won't be able to utilise it even with XMP memory installed.

Do AMD compatible motherboards support XMP?
Yes. You'll find most AM4 and AM5 Ryzen-compatible motherboards offer compatibility for XMP. However, you may still find reference to AMD's now-legacy technology AMP, or X-AMP, on occasion, and since the release of the AM5 socket AMD has had its own XMP equivalent, AMD EXPO for DDR5 RAM.
AMP stands for AMD Memory Profile, and though it's been around for a long time now it has never quite reached a level of market saturation that Intel's XMP has. It is essentially one and the same with XMP in practice, however—with a compatible memory kit, it makes it easy to enable faster memory profiles. Some motherboard manufacturers also took this into their own hands with DOCP and EOCP, which essentially turn XMP on for AMD boards using memory SPD settings. You don't often see these in use anymore, though, and you'd be hard-pressed to find memory with AMP-specific speeds nowadays.
What is AMD EXPO?
AMD EXPO or Extended Profile for Overclocking is the AMD equivalent to Intel's XMP profiles and is only available for supported DDR5 RAM and motherboards. Like XMP profiles, they act as automatic pre-tested overclocking profiles that can be enable in your BIOS for better performance.
DDR5 RAM sticks will most often run at 4,800 MT/s by default, and need an XMP or EXPO profile enabled in order to reach higher speeds. EXPO profiles are optimised for Ryzen 7000 series CPUs, and AMD claim they can provide up to 11% performance gains for 1080p gaming, and lower latency times over non-EXPO enabled RAM running at default speeds.
How do I enable AMD EXPO?
How do I enable AMD EXPO?
Much like XMP profiles, EXPO profiles are also enabled by your motherboard BIOS. Once EXPO supported RAM has been installed, enter your BIOS by hitting the required key while your PC is booting and before the Windows login screen. This will vary from manufacturer to manufacturer, but is usually activated by continuously pressing a key, often Delete or F2 at startup before the Windows boot screen.
You can also restart your PC by holding down shift and selecting the Restart option from the Windows start menu. This will reboot your PC into a selection of startup options and one of these should be an option to boot into UEFI settings, which is your BIOS.
Once within your BIOS, navigate to the menu location where you are able to adjust memory profiles. Again, this will vary between boards, so consult your motherboard manual or online documentation to find the exact menu you need.
If you're struggling to find the option and you are certain both your RAM and your motherboard support EXPO profiles, check to make sure that your BIOS is not in "Easy mode", as some motherboard manufacturers have two different sets of settings available, and "Advanced mode" or similar may enable the options you need.
Once you've found the AMD EXPO option, change it from "disabled" to "enabled", and make sure to remember to save and exit rather than just exiting the BIOS to ensure your new setting is saved.
Once your PC reboots and you're back in Windows, you can use a free application like CPU-Z to check to see if your setting change has been successful. If you've successfully enable EXPO, your memory operating frequency should match the rated speeds of your RAM, i.e. if you purchased 6,000 MT/s RAM you should now see a DRAM frequency of 3,000 MHz.
Remember that your RAM is DDR, or Double Data Rate, so two times the DRAM frequency here equals your full 6,000 MT/s rate, and in this example your EXPO configuration would be enabled successfully.
PC Gamer Newsletter
Sign up to get the best content of the week, and great gaming deals, as picked by the editors.

Jacob earned his first byline writing for his own tech blog. From there, he graduated to professionally breaking things as hardware writer at PCGamesN, and would go on to run the team as hardware editor. Since then he's joined PC Gamer's top staff as senior hardware editor, where he spends his days reporting on the latest developments in the technology and gaming industries and testing the newest PC components.
Most Popular

